
Step-by-Step Guide: How to Set Up a Facebook Ads Account
Step-1: Set up a Meta Business Portfolio
Before creating a Meta ad account, you must set up a Meta Business Manager (or Meta Business Suite). This overarching name houses all your business assets on Meta platforms.
Here's how to get started:
1. Go to Meta Business Manager by following this link: business.facebook.com. Then, click on the Create a Business Portfolio button.
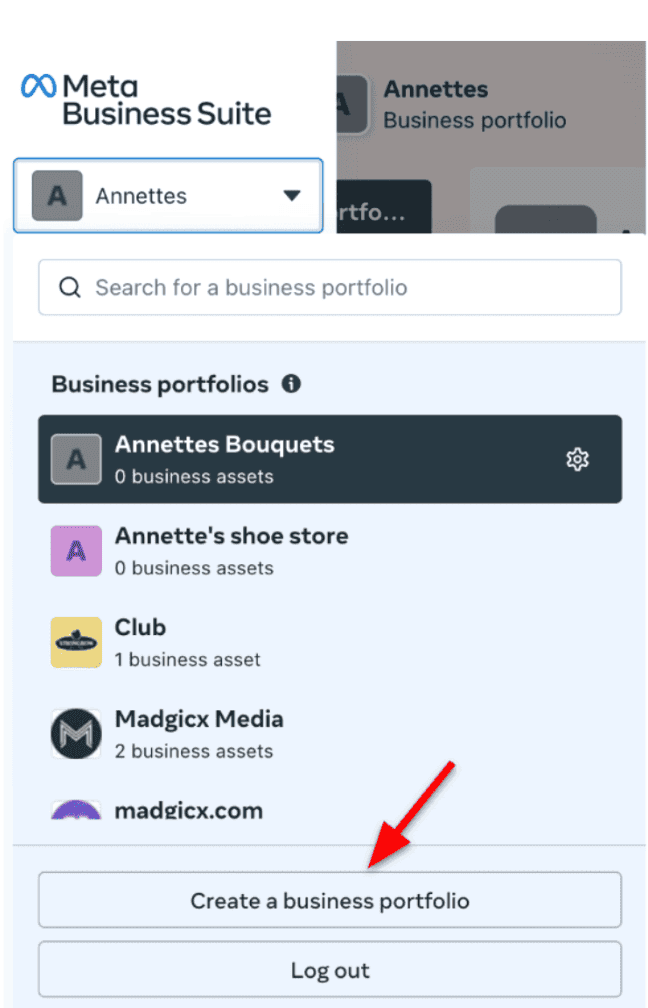
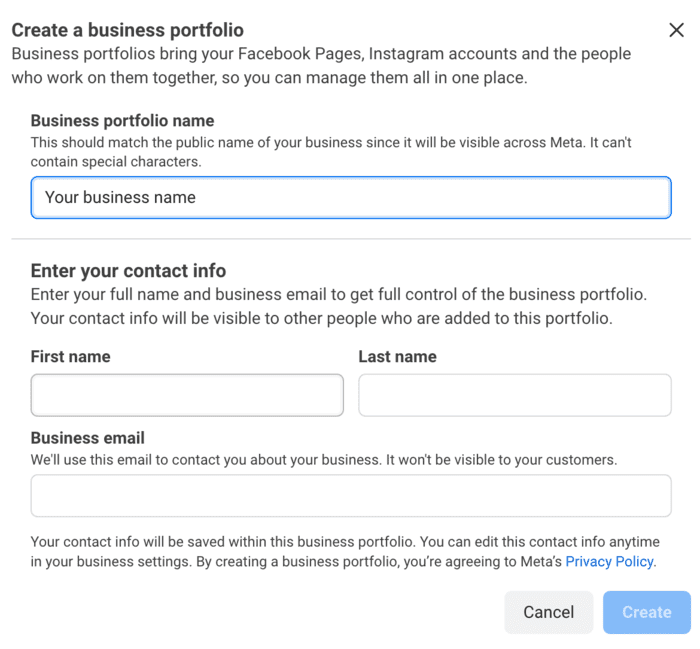
2. Enter your business name, your name, and the email address you want to use for your Business Manager account. It's important you write the correct account name as this is how you will show up across Facebook. Then click Create.
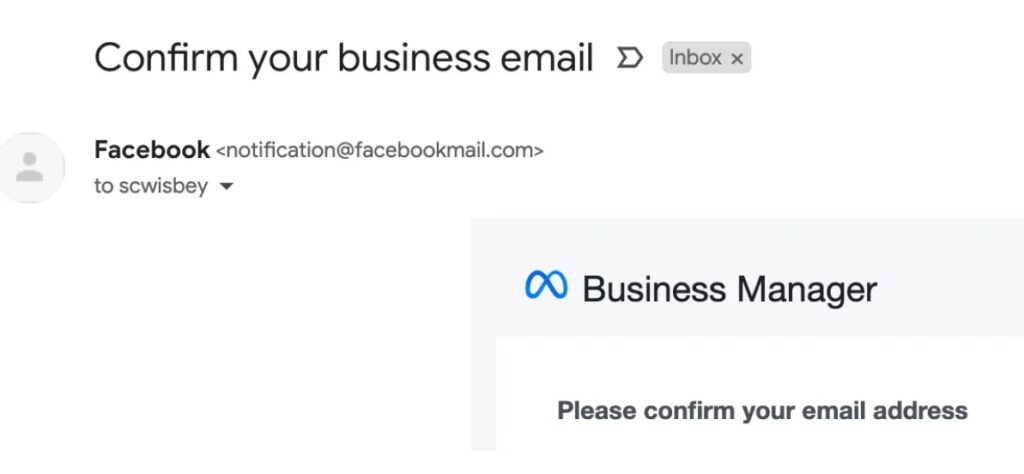
3. Verify your email address. You should receive a message from "notification@facebookmail.com" that asks you to confirm your business email address, and click Confirm Now.
4. You will now be redirected to your Meta Business Suite dashboard. Click Settings to complete your Business Suite.
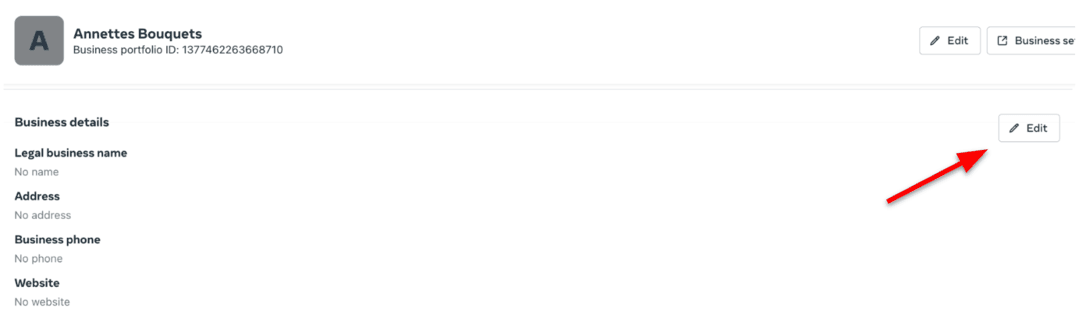
3. Click on the Business info at the top.

This page requires you to add your business details. Scroll further down to confirm your email address as well.
4. Navigate to the Security Center on the left side panel to ensure your business is verified.
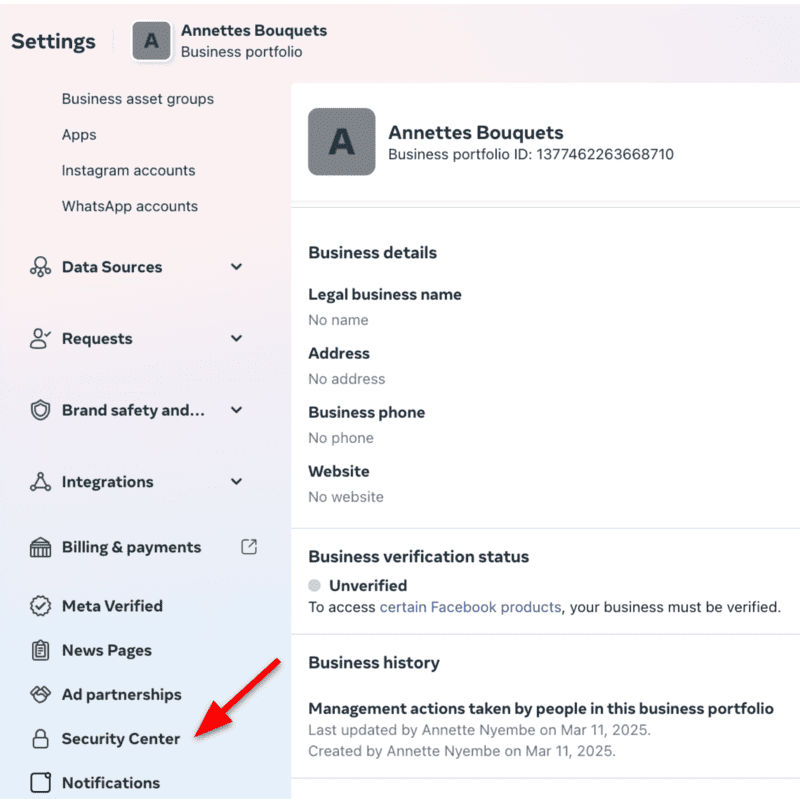
5. Look for the Start Verification button. Verified accounts are less likely to face random campaign blocks or account bans, making it a strategic move for businesses. For security purposes, Meta requires Business Portfolios to use two-factor authentication. Follow the prompts to set this up. On the right-hand side, you can add another admin to help if you get locked out of your account.

Step-2: Connect your Facebook Page to the Business Portfolio
Once your Meta Business Portfolio is set up, the next step is to ensure your key assets, like your Facebook Page, are linked to it. This connection is essential for running ads and managing your campaigns effectively:
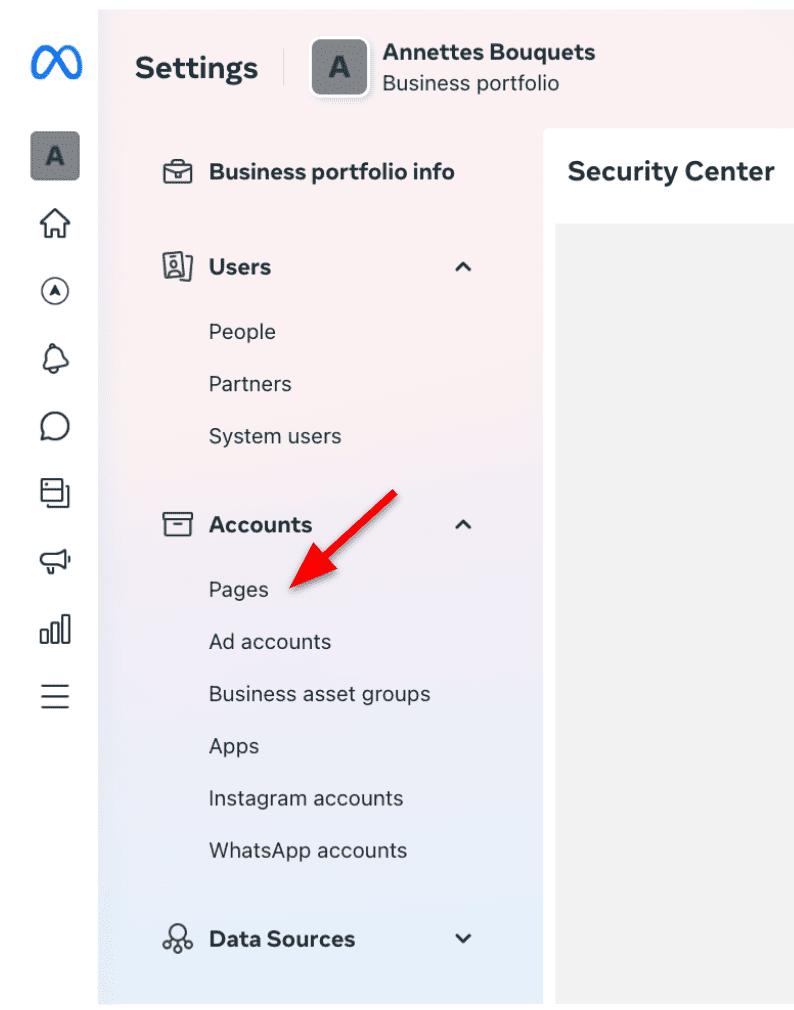
1. It’s time to add your Facebook Page. On the left-side panel, navigate to Pages.
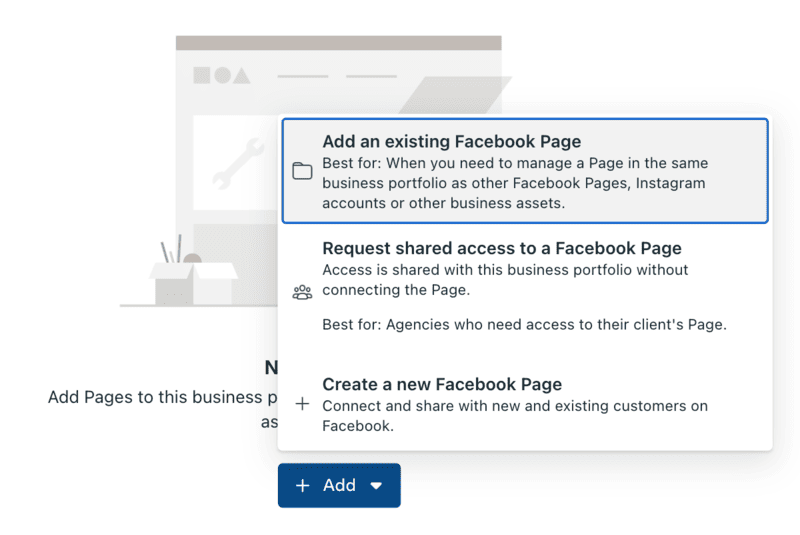
2. Tap the +Add dropdown menu and then select Add an existing Facebook Page to link your Facebook Page. Select the third option if you need to create a new Facebook Business Page. Click 'Next' afterward and follow the steps from there.
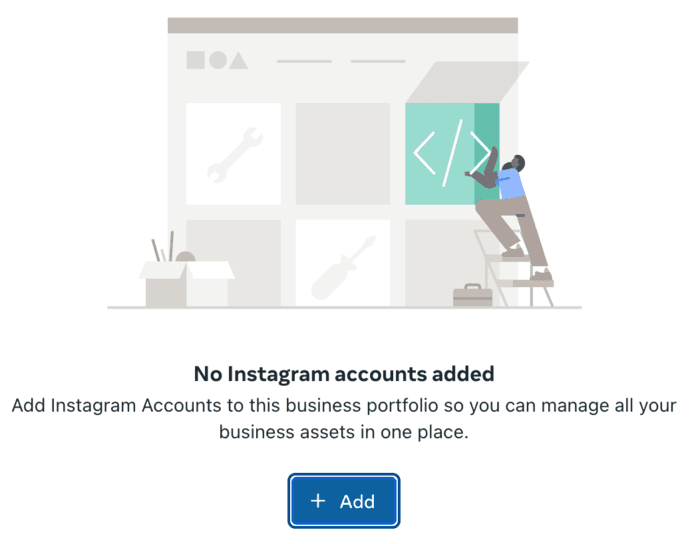
Connect your Instagram account to the Business Portfolio (Optional)
1. Scroll down to Instagram accounts in the same left-side panel menu.
2. Click +Add and enter your Instagram login credentials. After logging in, the Instagram account will move to your Business Portfolio.
Step-3: Create a Meta ad account
Now that you’ve connected your Facebook Page and Instagram account to your Business Portfolio, it's time to create your Meta ad account. Here's a step-by-step guide:
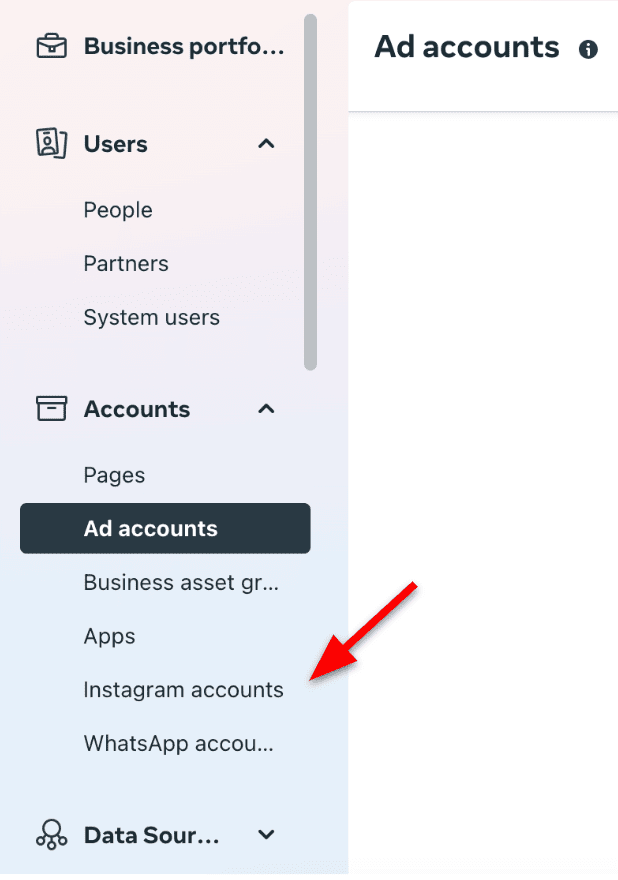
1. In the Business Portfolio, go to Ad accounts under the Accounts section. Tap +Add to add a new ad account.

2. Select the Create a new ad account option.

3. Assign a name to your ad account, select the appropriate time zone, and choose your preferred currency. Be sure to select the correct time zone and currency. These settings cannot be changed later without closing the account and starting a new one. Tap ‘Next’ when done.

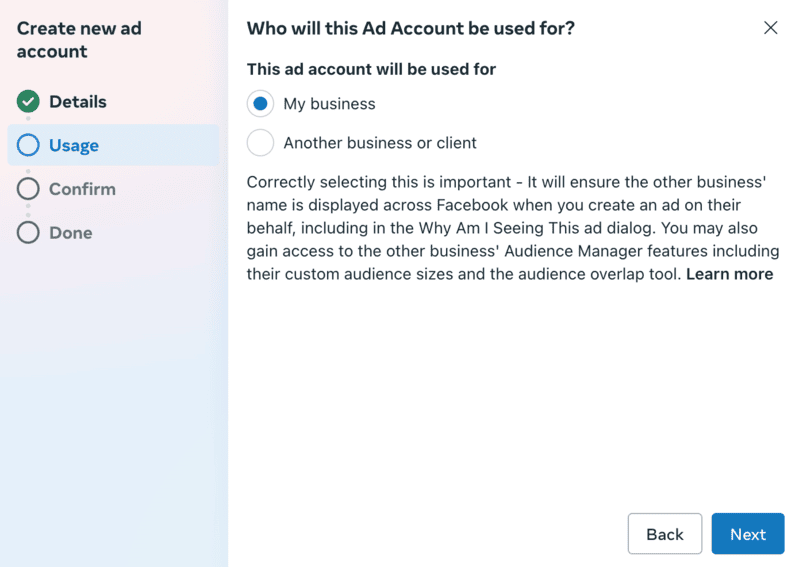
4. Indicate who you are using this ad account for, be it your business, another business, or a client. Then, click Next.
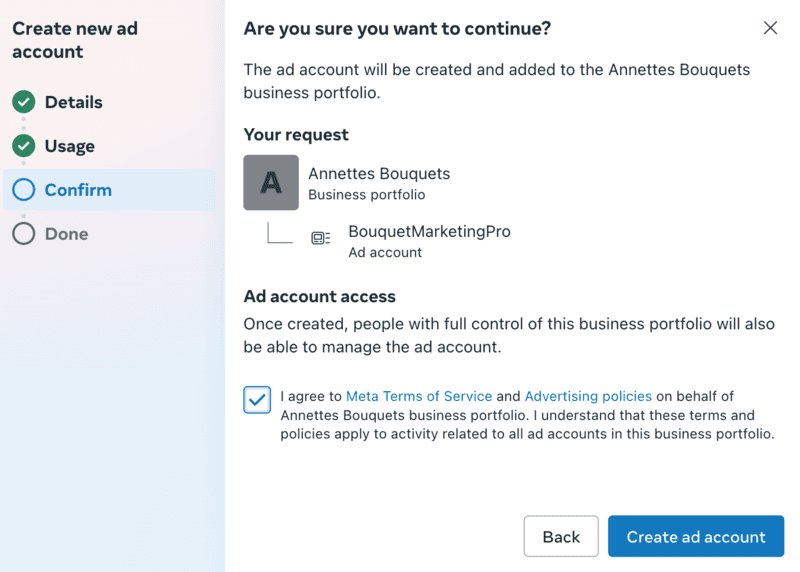
5. Accept the terms and conditions, then click Create ad account.
6. You'll need to set up payment information before you can run ads. Go to Billing & payments on the left-hand side panel.

7. Click Add payment method and follow the steps to add your credit card and other payment details.

Step-4: Set up Meta Pixel and Conversions API
The Meta Pixel and Conversions API are essential for tracking actions people take on your website after seeing your ads:
1. In Business Portfolio Settings, go to Data Sources > Datasets in the left-hand menu.

2. Once you’ve clicked either tab, tap +Add button to create a new Pixel.

3. Name your Pixel (typically your business name). Click Create to proceed.

4. You should now be looking at the new Pixel in your Business Portfolio.

Step-5: Granting access to us
If we’re managing your Facebook Ads campaigns, you’ll need to grant us access to your Meta assets.
1. Click to the Partners section in Business Portfolio Settings.

2. Click the blue Add button next to the search bar.

3. Click Give a partner access to your assets.

4. Click the Partner business ID field and enter a partner’s business ID, you should received an email which contains Transform Digital Business ID.

5. That will send me an invitation in next 2-4 hours, once I accept it, you should receive an email notifies you that I've accepted, and you can see my name in Partner section in Settings.
6. Now you need to assign Ad accounts and Datasets to us, so click Assign assets.
 7. Go to Ad accounts and Pixels, toggle all to Full Control so that we can access it. Click Assign assets.

8. And that’s it! You have set up your Facebook Business Manager, Facebook Ad account and added us as your digital marketing partner. If you're still having trouble, no worries! We’re here to help. Just reach out to us to schedule a quick consultation.

Step-By-Step Guide: How To Add Admin to Google Business Profile
Google Business Profile (formerly Google My Business) is a powerful, free tool for boosting your local SEO and improving your visibility in search results. If an external SEO agency handles your SEO, you'll need to grant them access to your profile. The instructions below will show you a simple and secure way to do this.
Here's how to get started:
1. Accessing the Profile:
- Go to your Google Business Profile, either through Google Search or Maps.
- Sign in with the Google account associated with your business.
2. Navigating to People and Access:
- Click on the "Menu" or "Settings" option (often a gear icon or three dots) within your Business Profile.
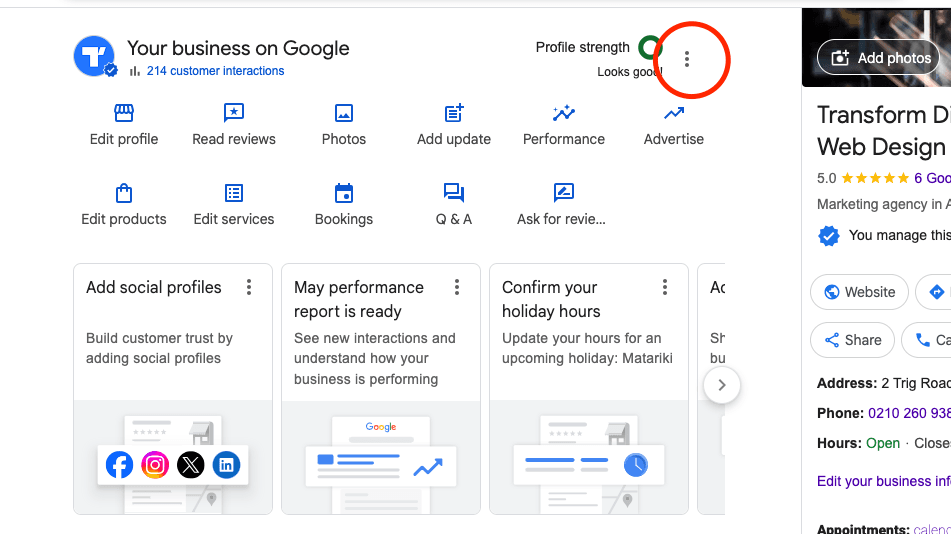
- Select "Business Profile settings".

- Choose "People and access".

3. Adding a User:
- Click the "Add" or "Invite new users" button.
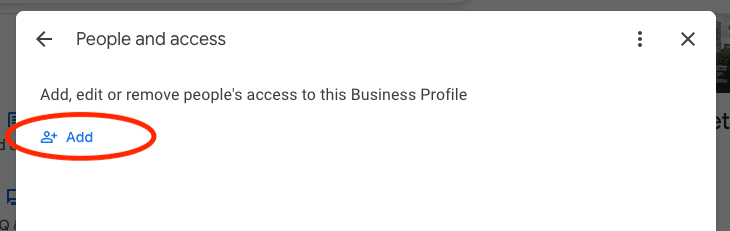
- Enter the email address of the person you want to add and select "Manager". Click "Invite" to send the invitation.


Step-by-Step Guide: How to Set Up a Google Ads Account
Here is a step-by-step guide on how to set up a Google Ads account, add a payment method and give us access to your account. (Please note that due to frequent updates to the Google Ads interface, the subsequent steps may vary slightly. If you encounter any discrepancies, please contact our support team for assistance.)
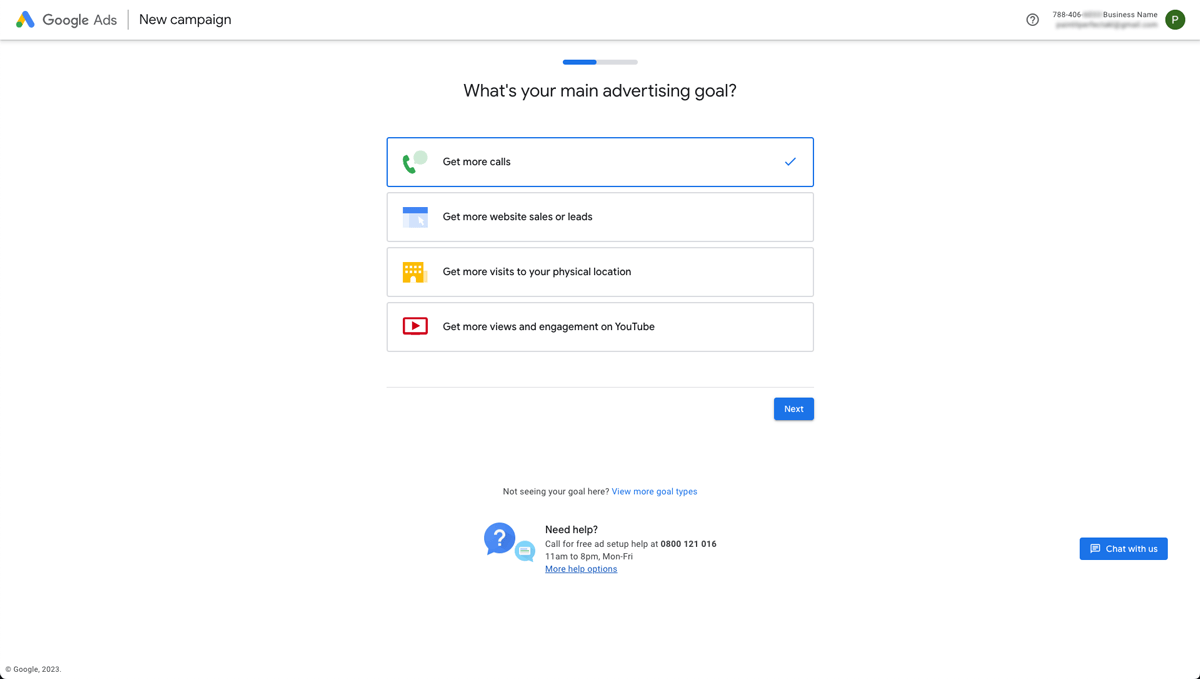
Step 1: Create a Google Ads account
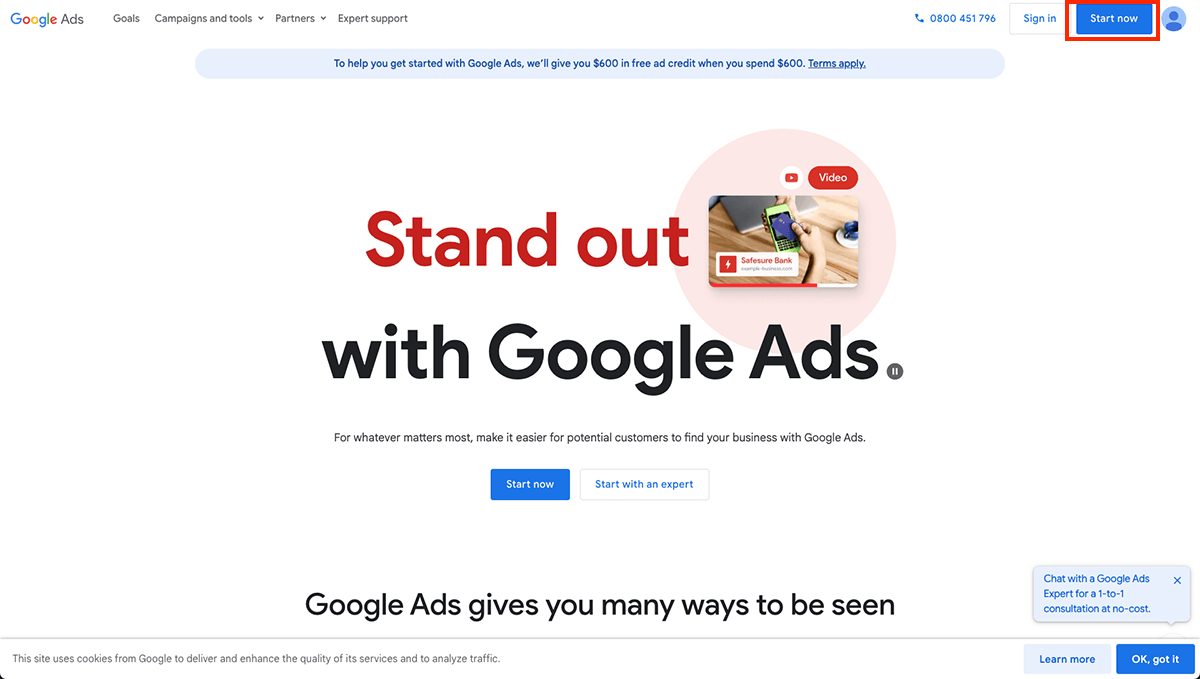
1. Go to the Google Ads website (https://ads.google.com/home/) and click on the "Start Now" button.
2. Enter your email address and create a password, or if you already have a Google account, just log in.
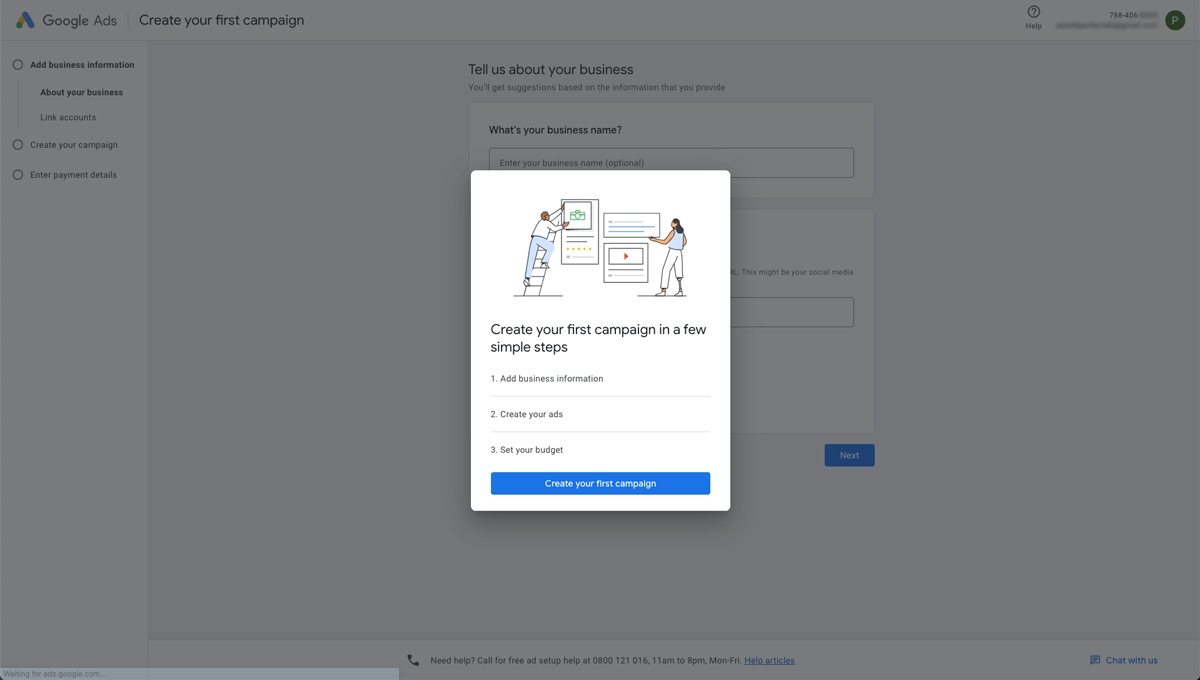
3. Enter your business details, and add your website's URL.

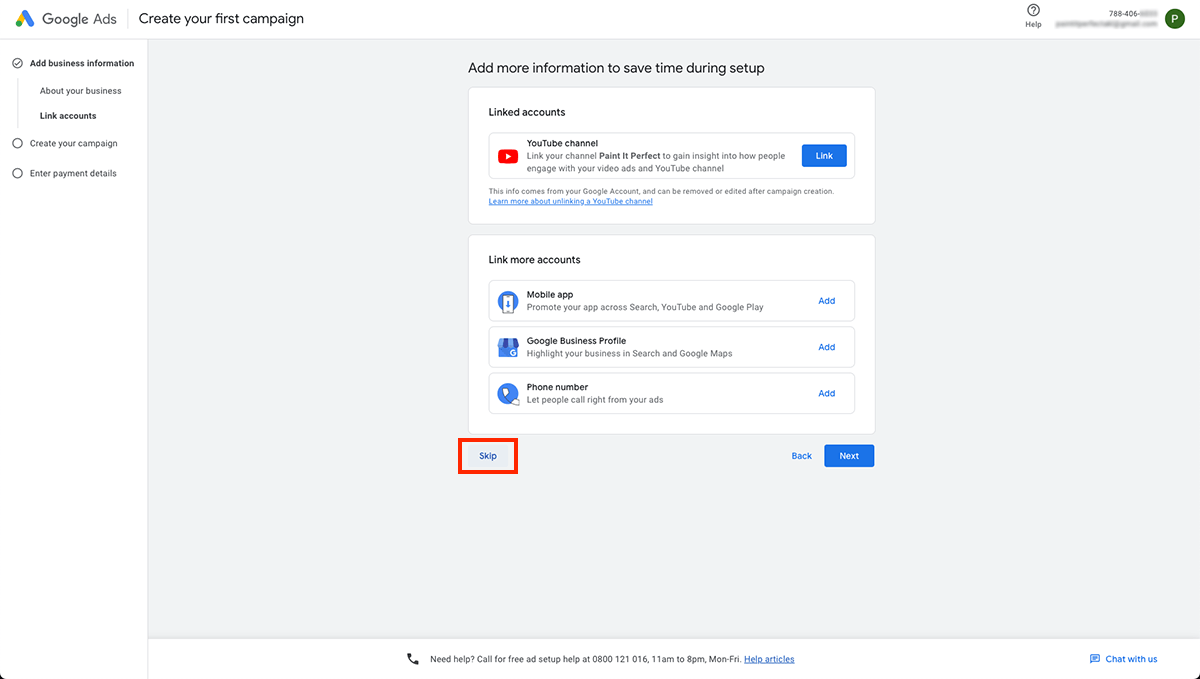
4. No need to worry about adding more information now. Go ahead and click the "Skip" button.
5. Click "Next" Button.
6. Click the "Set up an account only" button to bypass all other settings.
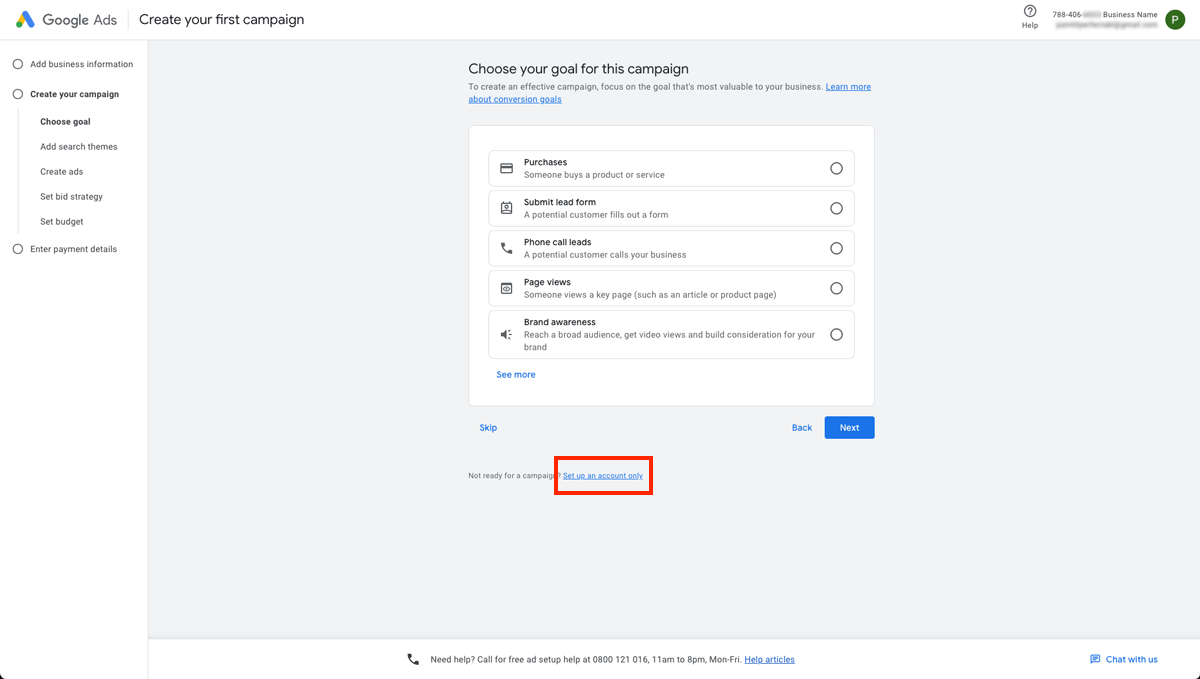
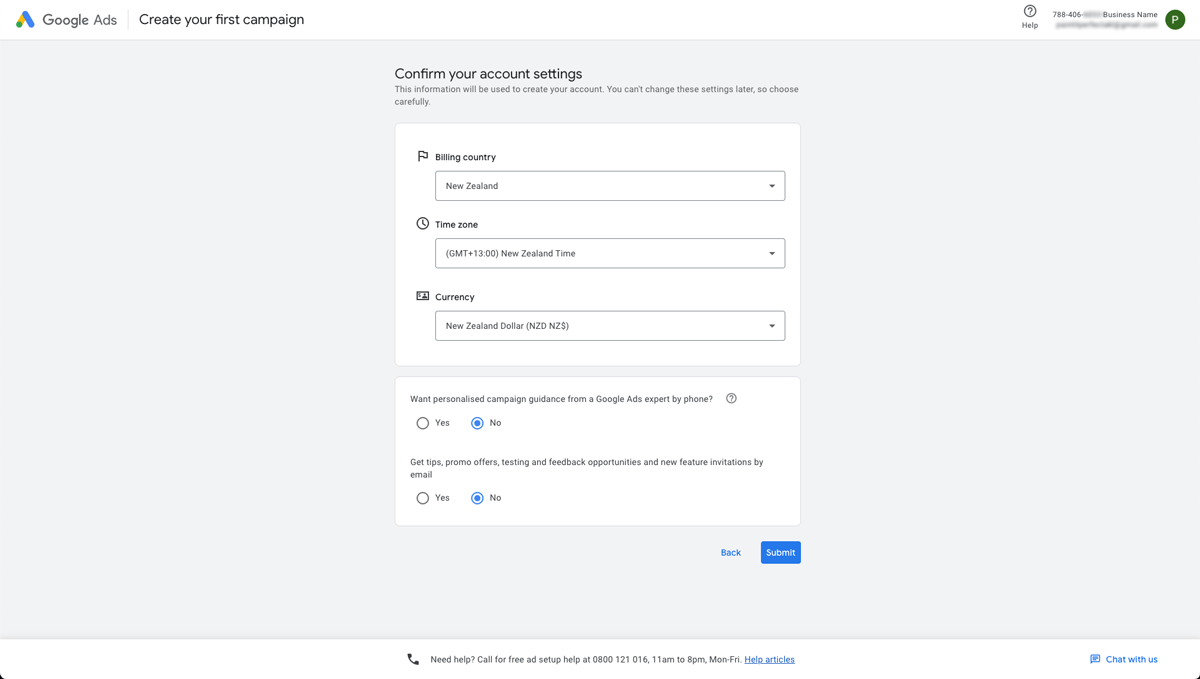
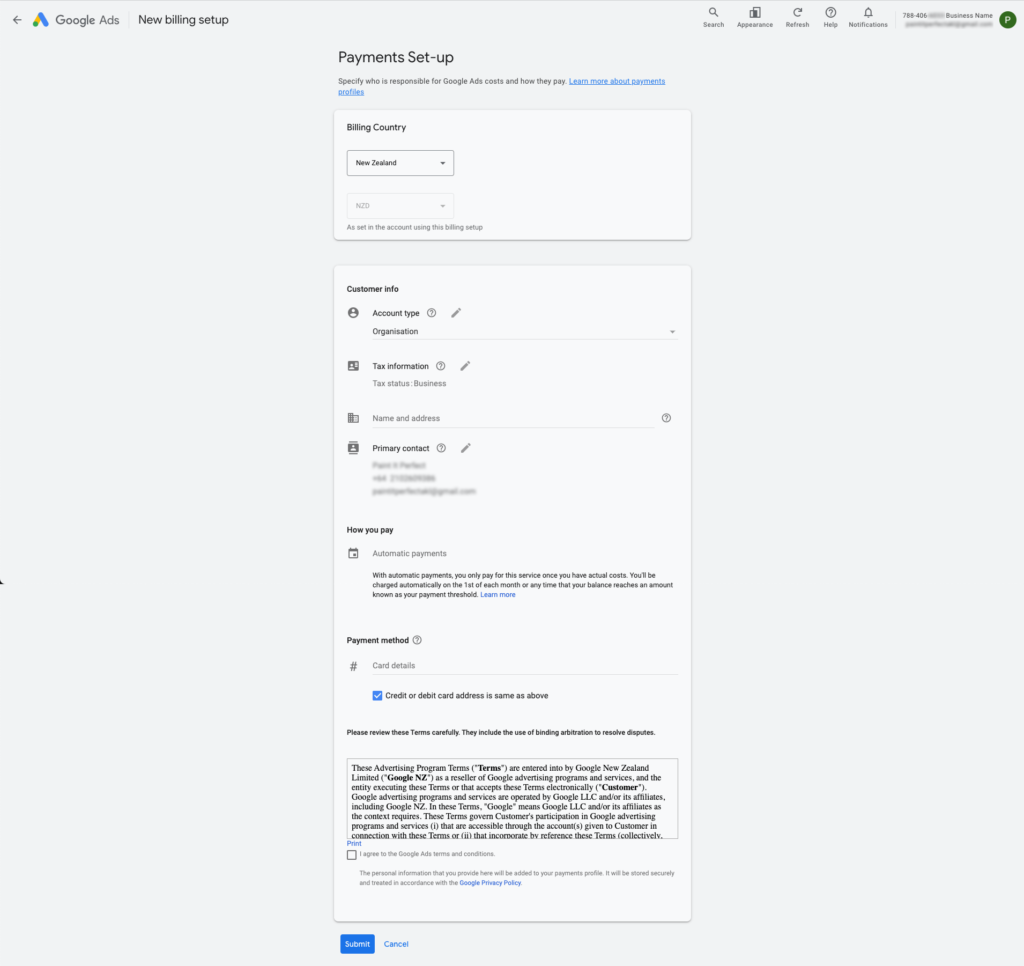
6. In the next step, you can just fill in your business details such as billing country, time zone, and currency, and click "Submit" button. Now your Google Ads account is created!
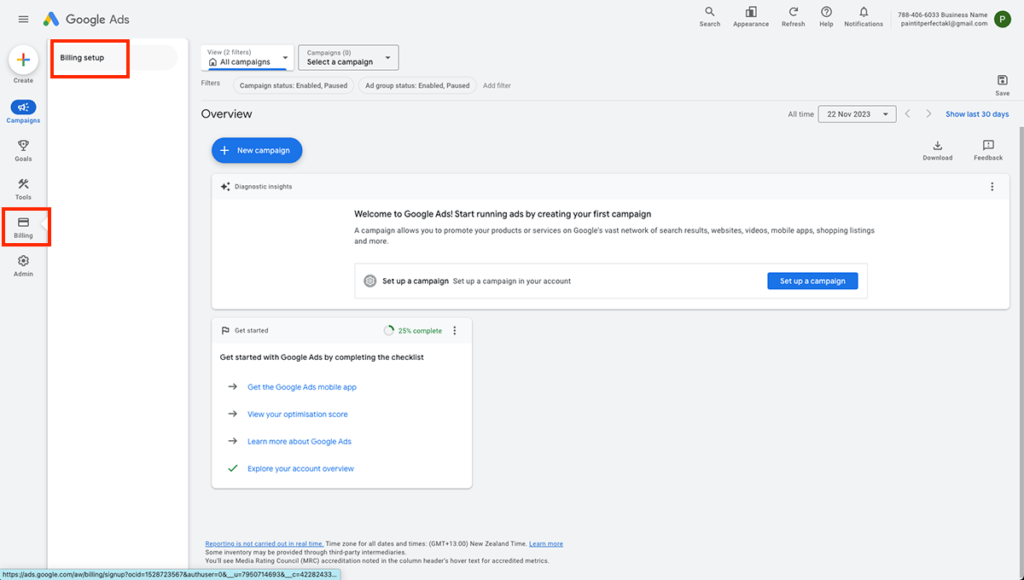
Step 2: Add a Payment Method
1. Click on the "Billing" icon in the left corner of the page, then select "Billing Setup".
2. In the next step, you can just fill in your credit card details and click "Submit" button. Now your payment method is added.
Step 3: Add Transform Digital as an Admin.
1. Click on the "Admin" icon in the left corner of the page, then select "Access and Security".
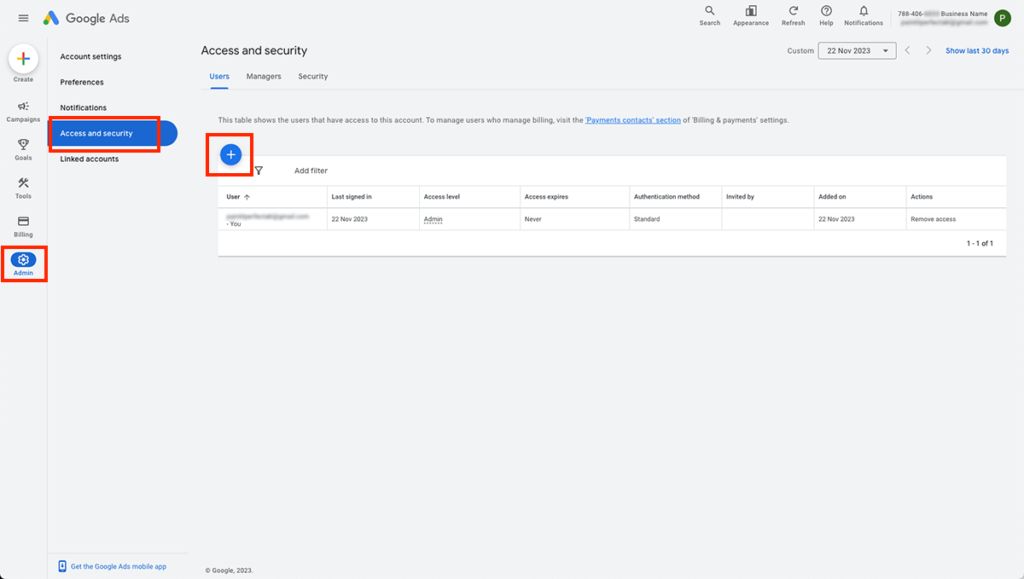
2. Enter "transformdigitalnz@gmail.com" in Email section, then select "Admin", and click "Send Invitation" button.

Great job! Now that you've granted us admin access, we're ready to assist you with configuring your campaign.