
How to set up a Google Ads account
To set up a Google Ads account, go to ads.google.com, sign in with a Google account, and choose to create an account without a campaign so you land in Expert Mode rather than Smart Mode. Then confirm your billing country, time zone, and currency (these are permanent), add a payment method, and set up conversion tracking before you launch anything. Only start a campaign once tracking is verified, so every dollar of spend is measurable.
Short answer To set up a Google Ads account, go to ads.google.com, sign in with a Google account, and choose to create an account without a campaign so you land in Expert Mode rather than Smart Mode. Then confirm your billing country, time zone, and currency (these are permanent), add a payment method, and set up conversion tracking before you launch anything. Only start a campaign once tracking is verified, so every dollar of spend is measurable. Setting up a Google Ads account only takes a few minutes, but the choices you make in those first few minutes shape everything that follows. Google's default sign-up flow pushes new advertisers into Smart Mode, a simplified version of the platform that hides most of the controls, and it happily lets you start spending before any conversion tracking exists. Both are avoidable if you know where to click. This guide walks through the full setup in order: creating the account in Expert Mode, locking in the right time zone and currency, adding billing, installing conversion tracking, and only then building your first campaign. It is written for New Zealand SME owners, so the local details, like billing country and NZD currency, are covered along the way. What do you need before you create the account?You need three things: a Google account (a work email you control, not a staff member's personal Gmail), access to your website so you or your developer can install tracking, and a credit card or debit card for billing. If your business runs on Google Workspace, use an address on your own domain so the account stays with the business if people change roles. It is also worth deciding upfront who will own the account. The business should always create and own its own Google Ads account, even if an agency manages it. An agency can be granted access later; you should never run ads from an account you cannot log into yourself. If an agency or freelancer ever offers to create the account under their own login, decline. Own the account and grant them access instead.
Step 1: Create the account and switch to Expert ModeGo to ads.google.com and click the button to start. Sign in with your Google account, and Google will begin walking you through creating your first campaign immediately. This is the Smart Mode onboarding flow, and the single most important move in the whole setup is to step out of it. Look for the small link that says something like 'Switch to Expert Mode' or the option to create an account without a campaign. The wording changes as Google updates the interface, but the option is always there, usually in small text near the bottom of the screen. Choosing it gives you a full Google Ads account with every setting exposed, and it does not force you to launch a campaign before you are ready. Smart Mode is not just a simpler interface; it is a different product. It limits your keyword control, hides search term data, and makes broad automated decisions on your behalf. Almost every underperforming small business account we audit in Auckland started life in Smart Mode and was never switched. If you have already created a Smart Mode account, you can convert it to Expert Mode in the settings, and you should. 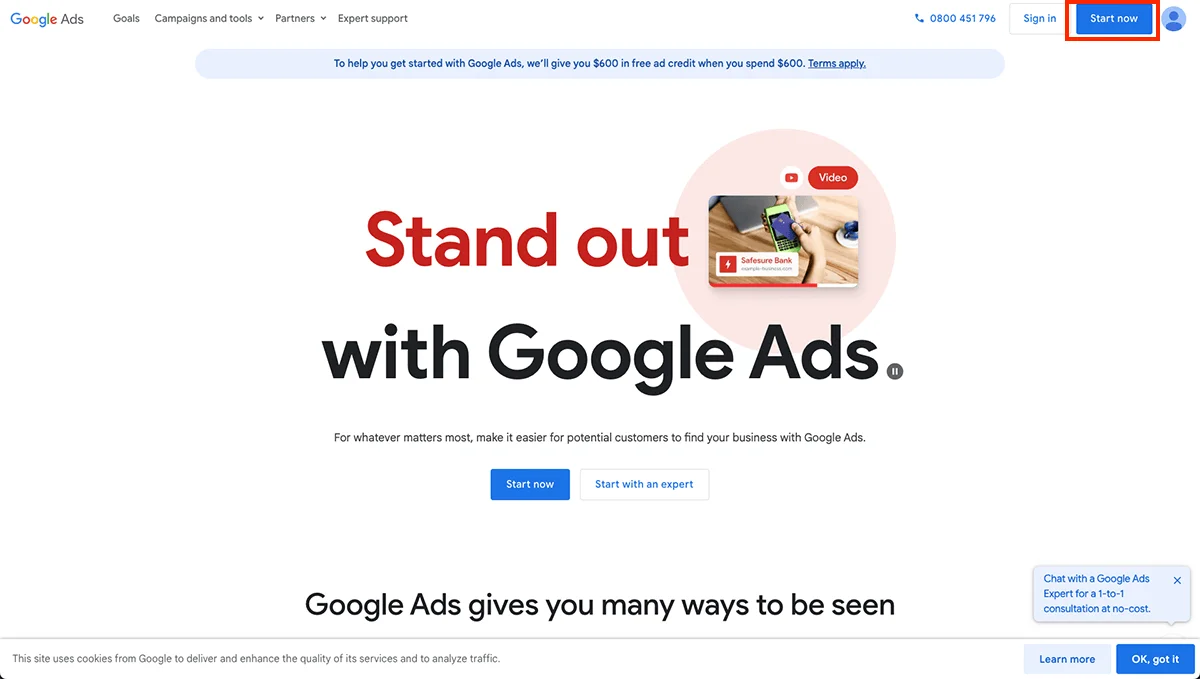 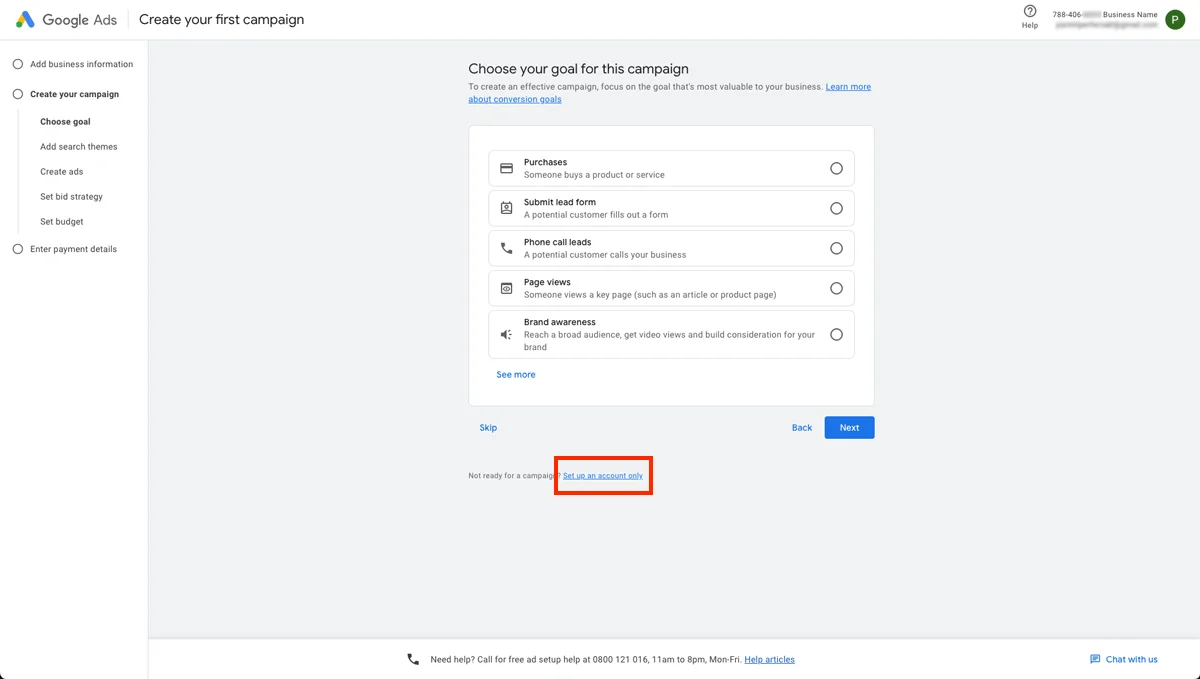 Never finish the default sign-up flow as presented. The Expert Mode link is deliberately easy to miss, and skipping it is the most common setup mistake.
Step 2: Set your billing country, time zone, and currency carefullyBefore your account is finalised, Google asks for your billing country, time zone, and currency. For a New Zealand business that means New Zealand, the Auckland time zone, and NZD. Take thirty seconds to double-check these, because two of them are permanent: once the account is created, the time zone can only be changed once in limited circumstances and the currency can never be changed at all. Getting these wrong is more painful than it sounds. A wrong currency means every budget, bid, and report is in the wrong units for the life of the account, and the only fix is to close the account and start again, losing all history. A wrong time zone means your reporting days do not line up with your actual trading days, and ad scheduling fires at the wrong hours. 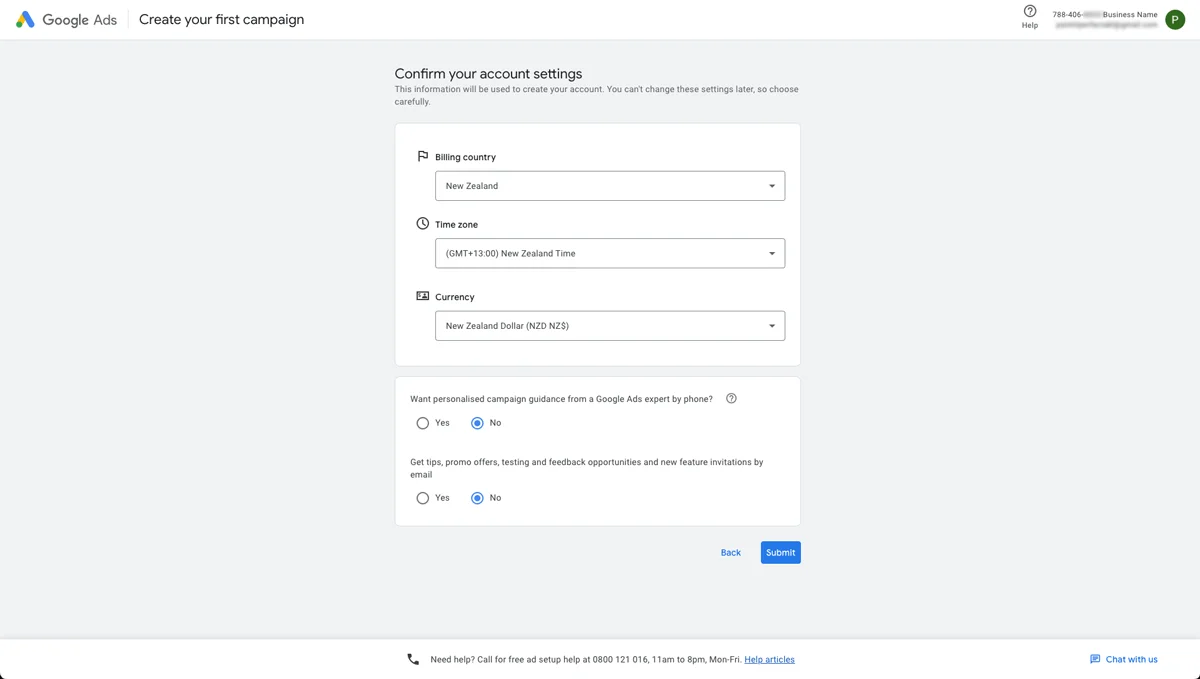
Step 3: Add a payment method in BillingWith the account created, open the Billing section from the left-hand menu and go to billing setup. Enter your organisation's legal details, your GST-relevant business information, and your card details, then submit. Most New Zealand accounts run on automatic payments, where Google charges your card after the ads have run, either when you hit a billing threshold or at the end of the month, whichever comes first. Use a business card rather than a personal one, and make sure the billing profile matches the entity that should receive the invoices, since Google issues its documentation to the billing profile you set here. If billing is not completed, your ads simply will not serve, so it is worth finishing this step even if you do not plan to launch for a few weeks. One warning: adding billing means the account is live and able to spend. If you experimented with the Smart Mode flow earlier and a draft campaign exists, check the Campaigns tab and make sure everything is paused or removed before your card is attached. 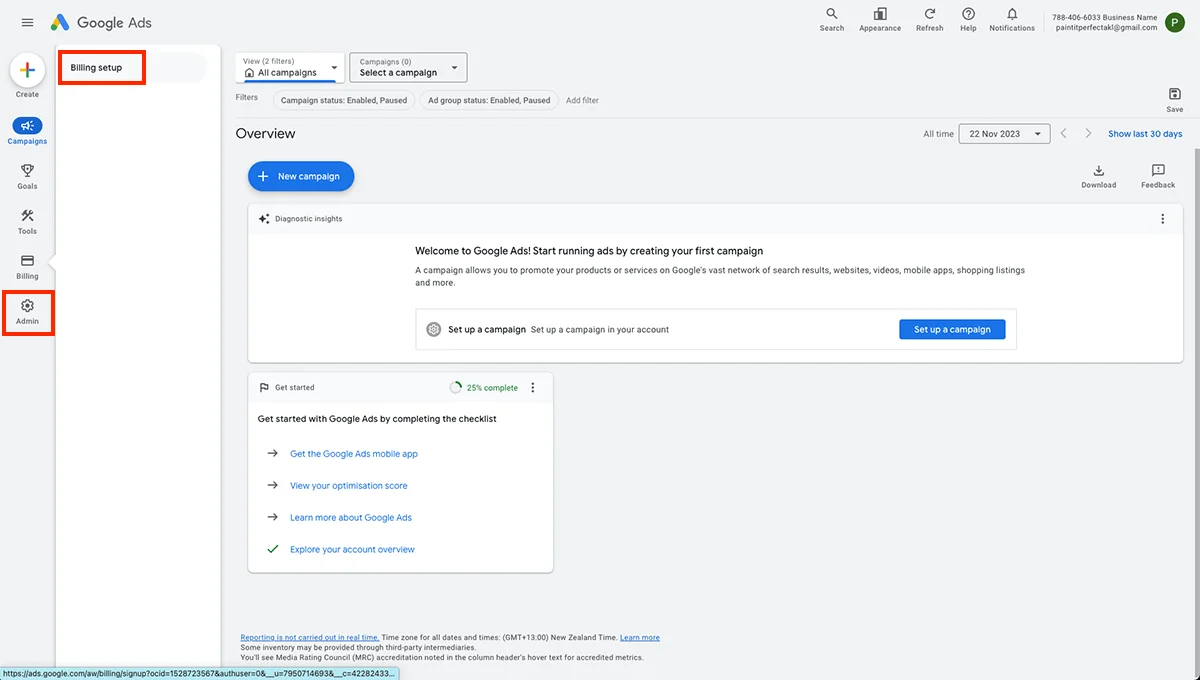 After adding billing, open the Campaigns tab and confirm nothing is enabled. Orphaned draft campaigns from the sign-up flow are a classic source of surprise charges. Step 4: Set up conversion tracking before you spend a dollarThis is the step most businesses skip, and it is the one that separates accounts that improve over time from accounts that burn budget. A conversion is the action that actually matters to your business: a contact form submission, a phone call, a booking, or a purchase. Without conversion tracking, Google Ads can only tell you about clicks, and clicks pay no invoices. In the account, go to the Goals or Conversions section and create a conversion action for each outcome you care about. For most NZ service businesses that means a form submission conversion and a phone call conversion at minimum. Google gives you a tag to install on your website; you can place it directly, through Google Tag Manager, or by importing goals from Google Analytics 4. Tag Manager is usually the cleanest option because it keeps all your tracking in one place. Once installed, test it. Submit your own form, then check that the conversion shows as verified in Google Ads (it can take a few hours to move out of pending). Only when you can see a test conversion recorded should you consider spending money, because Google's bidding systems learn from conversion data, and an account that launches without it teaches the algorithm nothing. Treat conversion tracking as a launch blocker, not a nice-to-have. No verified conversions, no live campaigns.
Step 5: Link Google Analytics and set up account accessTwo housekeeping tasks round out a proper setup. First, link your Google Analytics 4 property to Google Ads under the linked accounts settings. This lets you import audiences and goals, and it lets you see how paid visitors behave on your site compared with organic ones. Second, sort out access. In the Admin section, under access and security, you can invite other users by email and set their permission level. If you work with an agency, invite them as an admin or standard user from here, or accept a link request from their manager account. Keep the list short, remove people when they leave, and enable two-step verification on the Google account that owns everything. 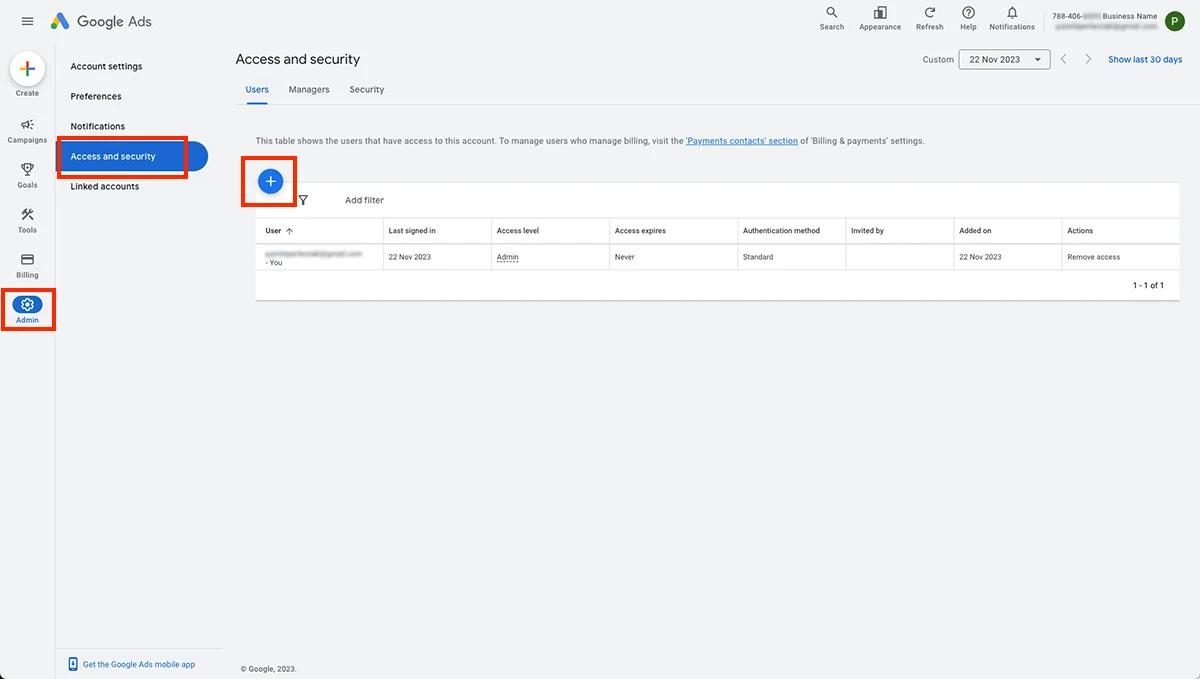 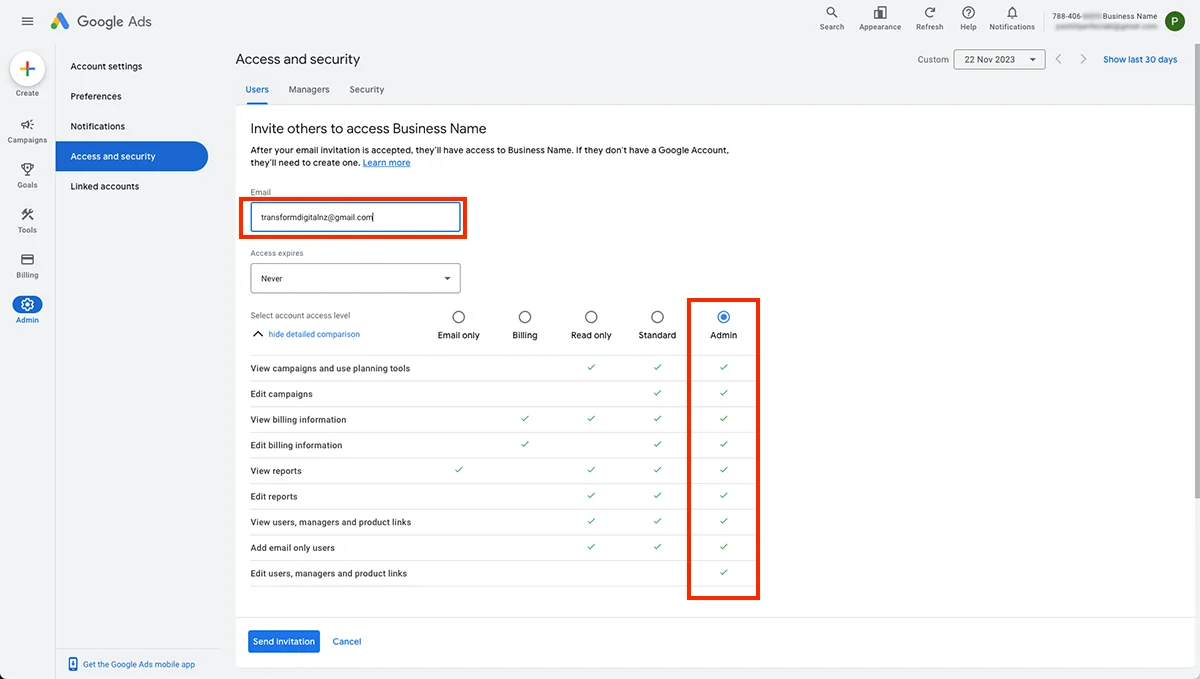
What should you do after the account is set up?With the foundation in place, you can build your first campaign properly: a Search campaign around the exact services people look for, tightly themed ad groups, location targeting set to the regions you actually serve, and ads that point to relevant landing pages rather than your homepage. Start with a modest daily budget you can sustain for at least a month, because Google's systems need time and conversion data to optimise. For a lot of Auckland and wider New Zealand SMEs, the setup above is where things quietly go wrong: Smart Mode never gets switched off, tracking never gets verified, and the account spends for months with no way to tell which keywords produce enquiries. If you would rather have someone check the setup before real budget goes through it, an independent audit of your account, tracking, and landing pages is a cheap insurance policy. Give a new campaign at least three to four weeks of consistent budget before judging it; the first fortnight of data is mostly the system learning. Related servicesSources and further reading |

NEXT STEP
Want to know what your site should improve first?
Start with the three-step audit form. We will review your service pages, local SEO, technical setup, AI-search readiness, tracking, and enquiry path.
Start with an audit